At LayeredCraft, we're big on automating repetitive tasks and finding ways to make our development process more efficient. But even we have to admit – keeping a local testing site and production site in sync is a challenge, even with Ghost.
Today we’re going to show you how LayeredCraft develops and tests our Ghost themes on local servers (our own computers) and then deploys updates to a live production server.
Whether you’re a seasoned theme developer or simply run a Ghost website and want to make some custom modifications to your theme, using GitHub and GitHub Actions to manage your theme files and deployments is incredibly useful to know and can save you a lot of time and effort!
How It All Works
Let’s take a look at the workflow for using GitHub for Ghost theme development. Don’t worry if some steps are unclear at this point, we’ll cover them later on in the tutorial.
- You have a repository on GitHub where you’ll store the source code for your Ghost theme
- You download (or “pull” in Git terms) the repository from GitHub and save it on your local machine.
- Now you can work on the project on your local computer. After you’ve made your changes, you can upload (or “push” in Git terms) them back to GitHub.
- Using GitHub Actions, when you push changes into your GitHub repository, the theme source code will automatically be deployed to your production Ghost site.
Before We Get Started
To get started you’ll need to get yourself these four things:
- A local Ghost server Having a local server for Ghost on your computer is the first step for developing a new or modifying an existing Ghost theme. For a detailed how-to guide on getting a local server up and running, check out the official guide from Ghost.
- A production Ghost server If you don’t yet have a production server for your Ghost website, there are two excellent options we recommend. You can find out about them on our website. We also published a guide to setting up a Ghost Blog in Just One Click on DigitalOcean.
- A GitHub account GitHub is where you’ll store the source code for your Ghost theme and where deployments will be automated from. A GitHub account and some basic familiarity with Git and GitHub would be useful here and to help you with that, check out this excellent guide by the official GitHub team.
- The GitHub App The official GitHub app for Mac or Windows is what we’ll be using to manage our repository, including “pushing” and “pulling” code changes to and from GitHub.
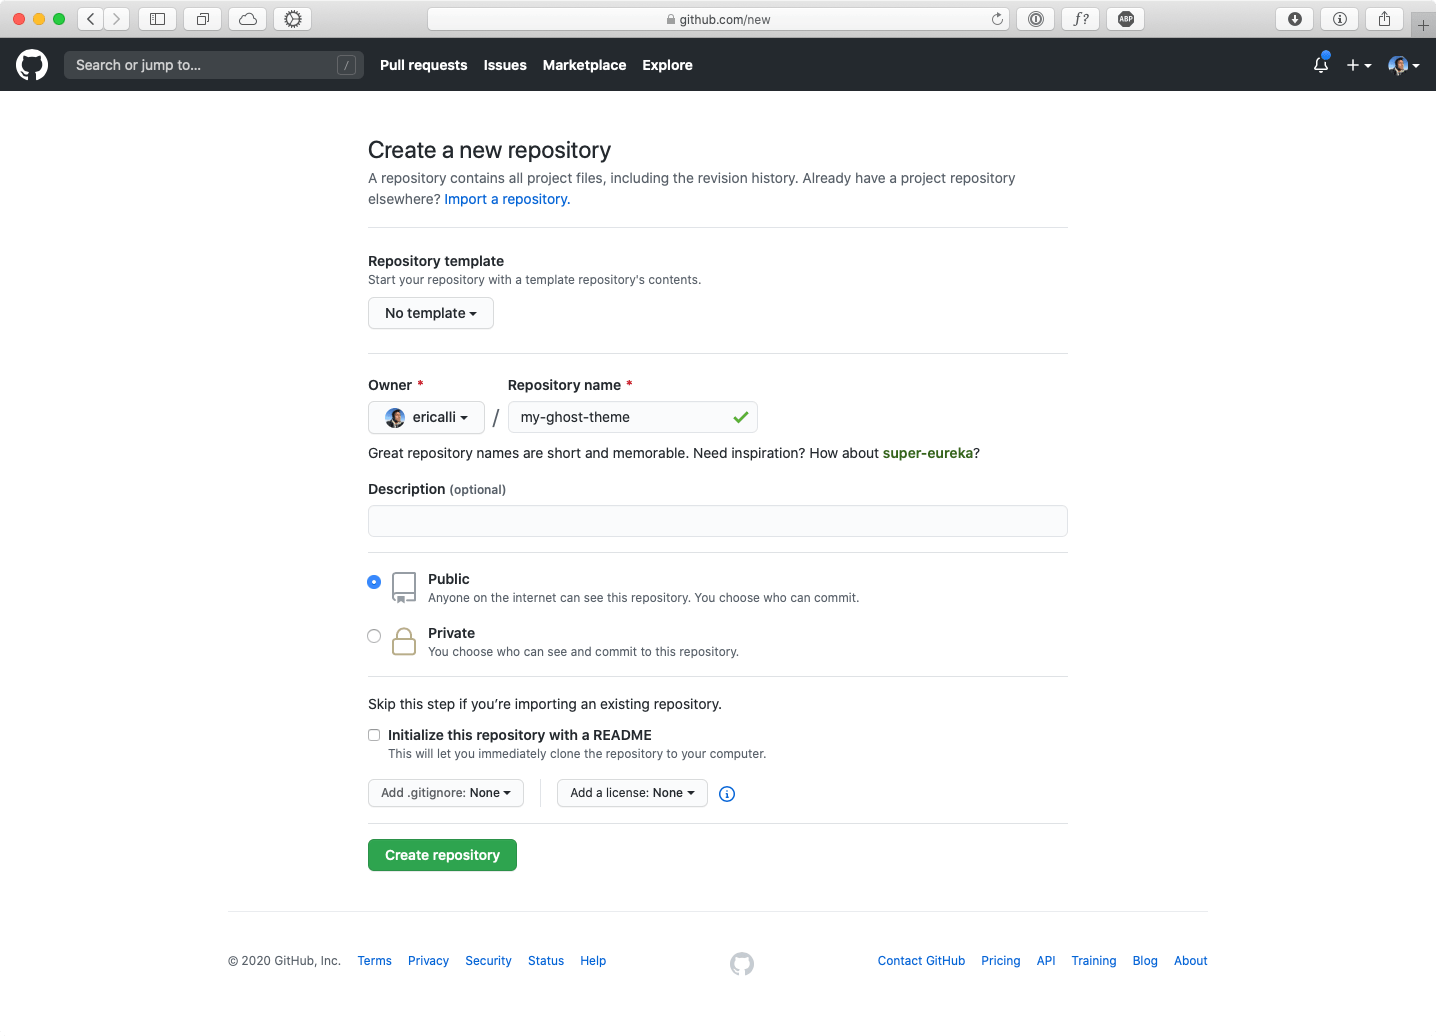
Step 1: Create a GitHub Repository
The first step is to login to your GitHub account and create a new repository. You can name the repository anything you’d like or simply give it the name of the theme you are working on. For this tutorial I’m going use the name my-ghost-theme.
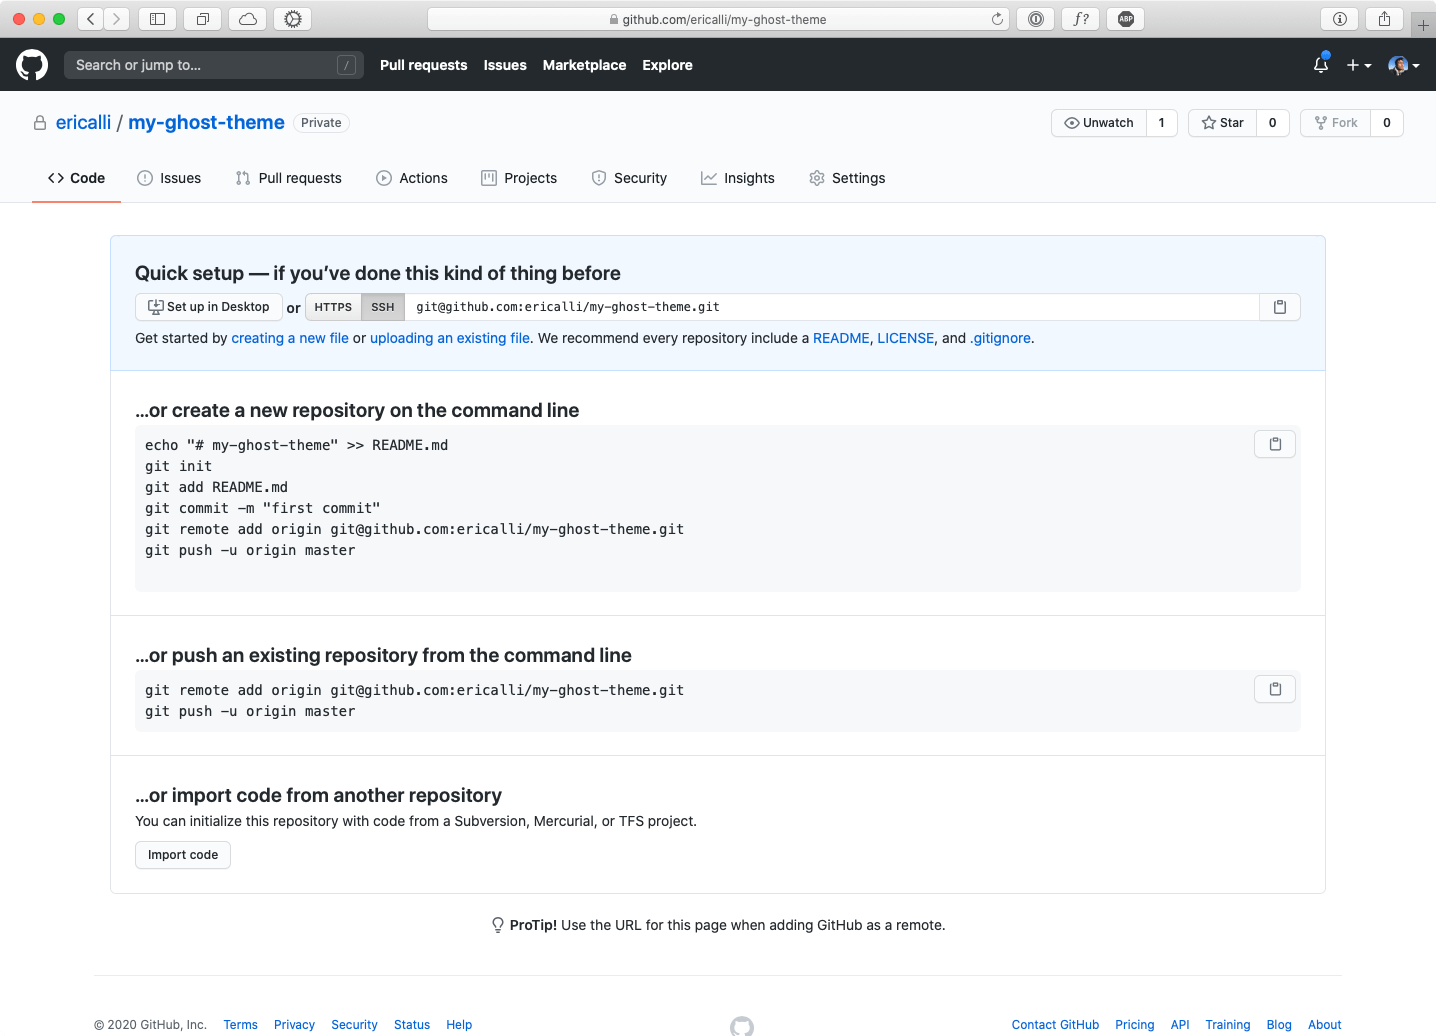
Once created, you’ll see the screen below. You can ignore most of the instructions on this page and click the Set up in Desktop button to open the GitHub app where we’ll finish the rest of the setup.
The GitHub app should open up and from there the Repository URL field will be auto-populated with your repository URL.
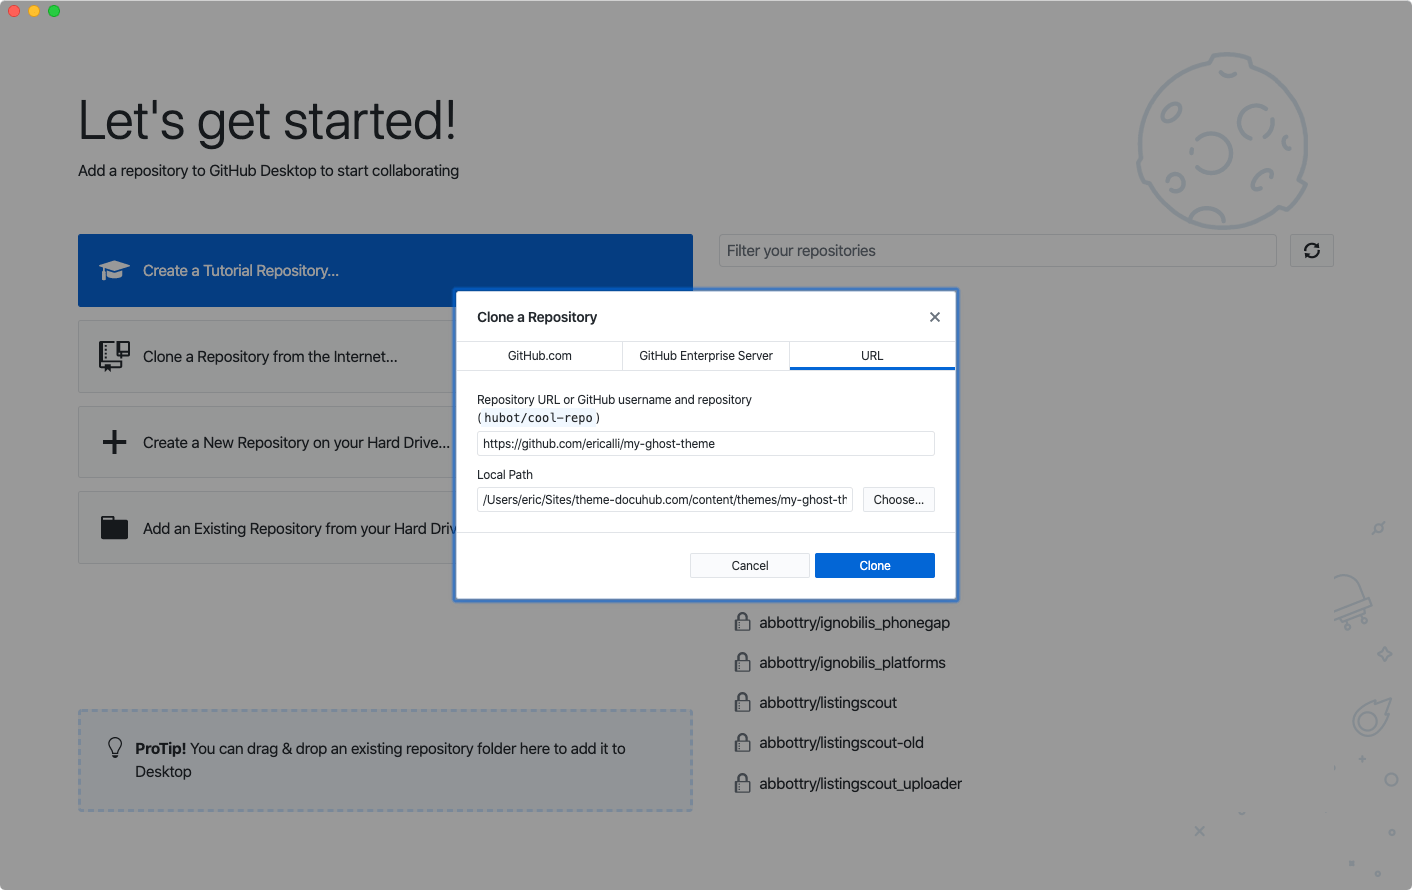
For Local Path navigate to the content/themes folder where you installed Ghost on your computer and click Open.
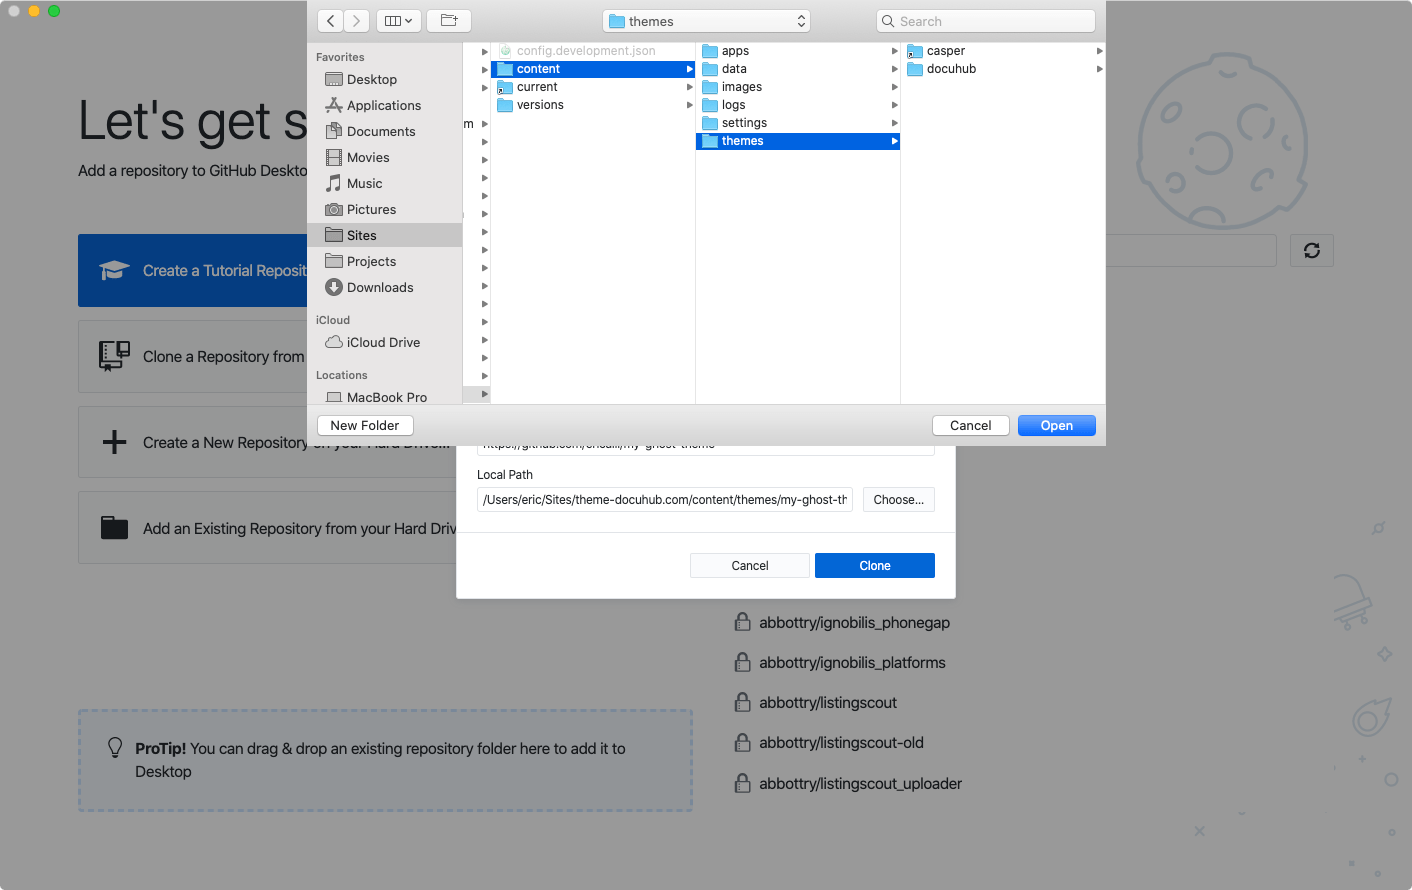
Lastly, click the Clone button to download the repository to the themes folder. You should end up with the following screen:
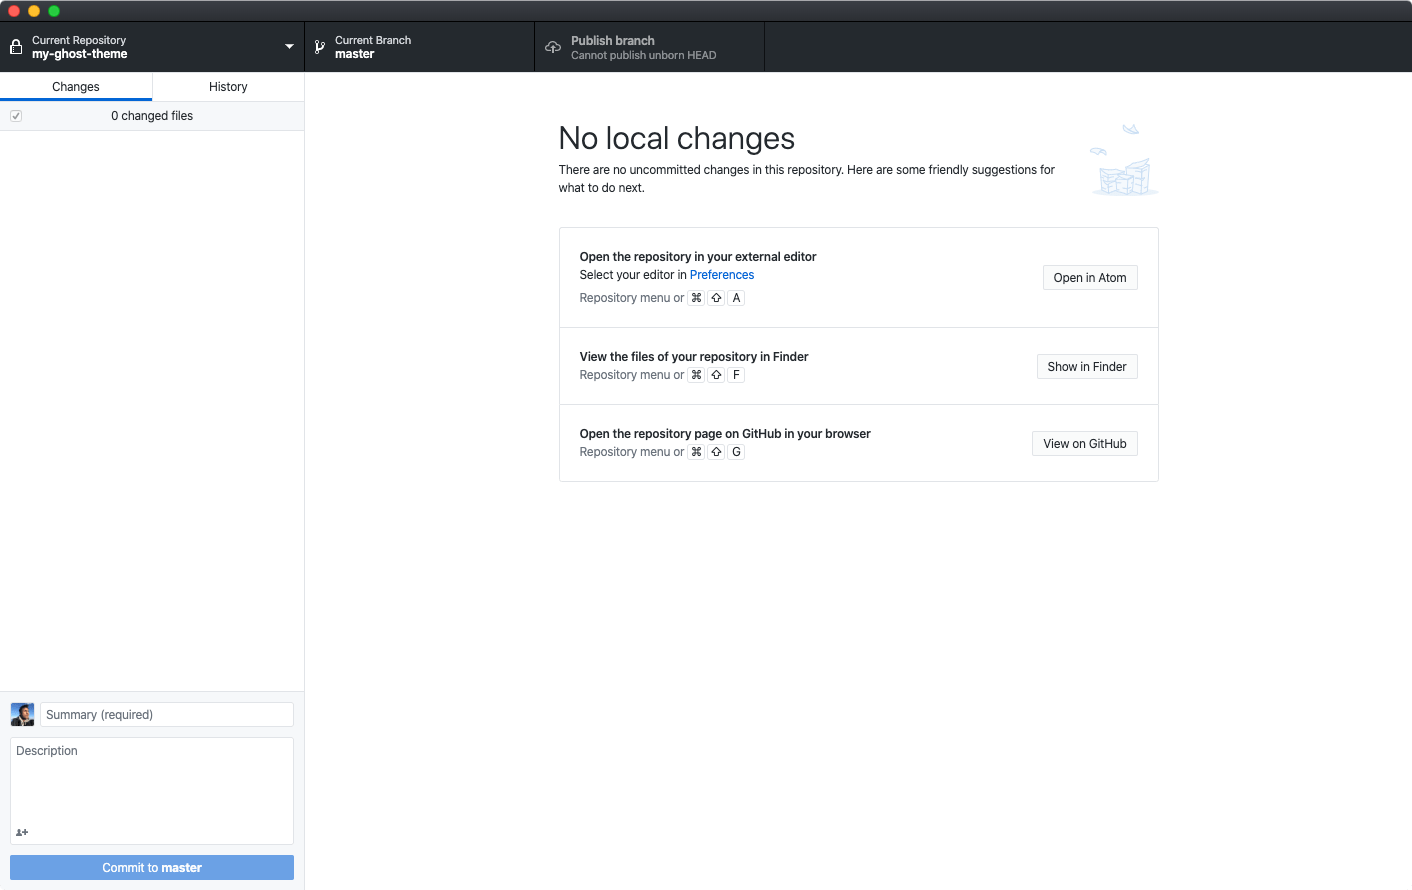
You’ll notice that the GitHub app created a new folder in the content/themes of your Ghost install. Don’t worry, it should be empty.

Step 2: Add Theme Files To Your GitHub Repository
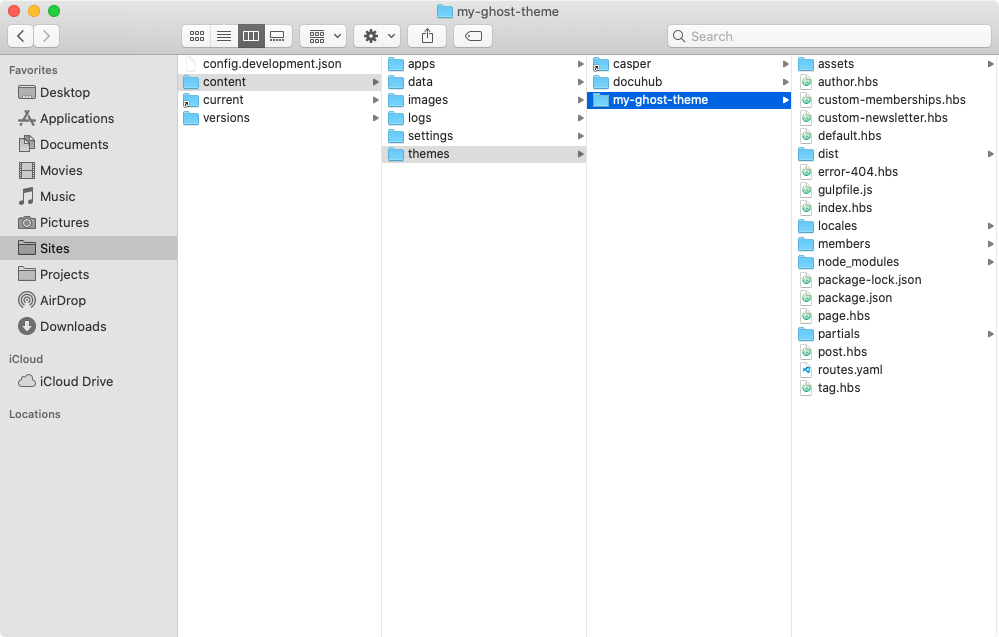
Nest step is to copy and paste all of the files from your existing Ghost theme into the new theme folder that was created in Step 1.
In this example I’m copying my themes files from an existing theme called docuhub into my newly created theme folder my-ghost-theme from GitHub.
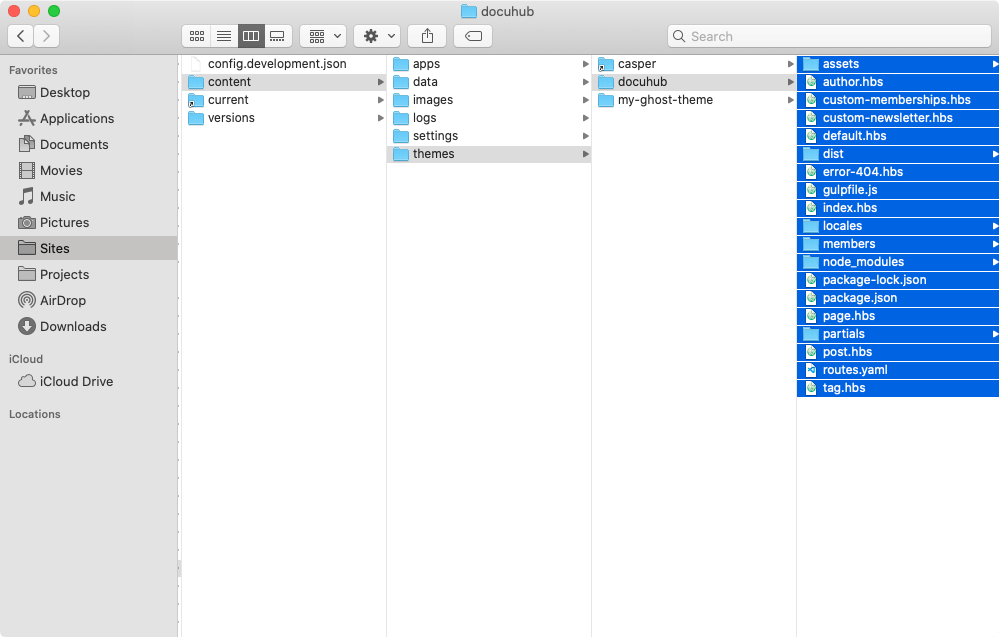
Then, paste the copied theme files into your new theme folder.
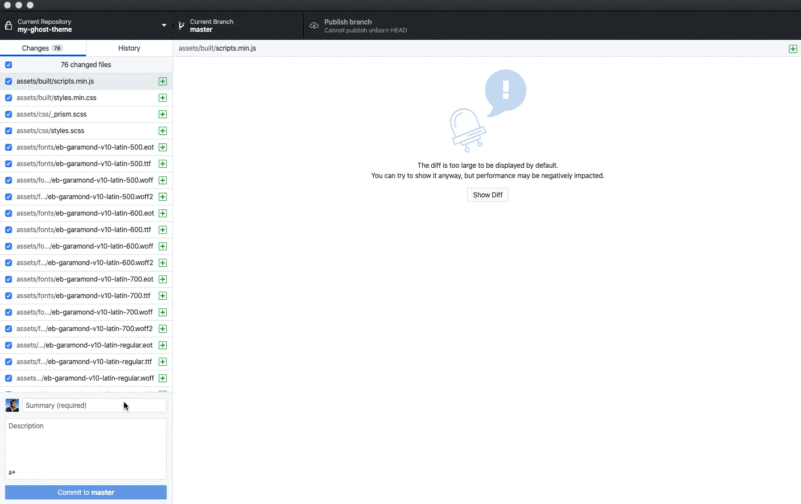
Head back over to the GitHub app and you should now see it has automatically populated itself with a list of files in the left side panel. This list represents the “uncommitted” changes to the repository (the theme files you copied and pasted but have not yet “pushed” to GitHub).

In order to “commit” these changes, we’ll need to add a Summary (a brief note describing the changes you’ve made) and then click the Commit to master button.
Finally, click the Publish branch button to “push” our changes to GitHub.
Step 3: Add Custom Ghost Integration
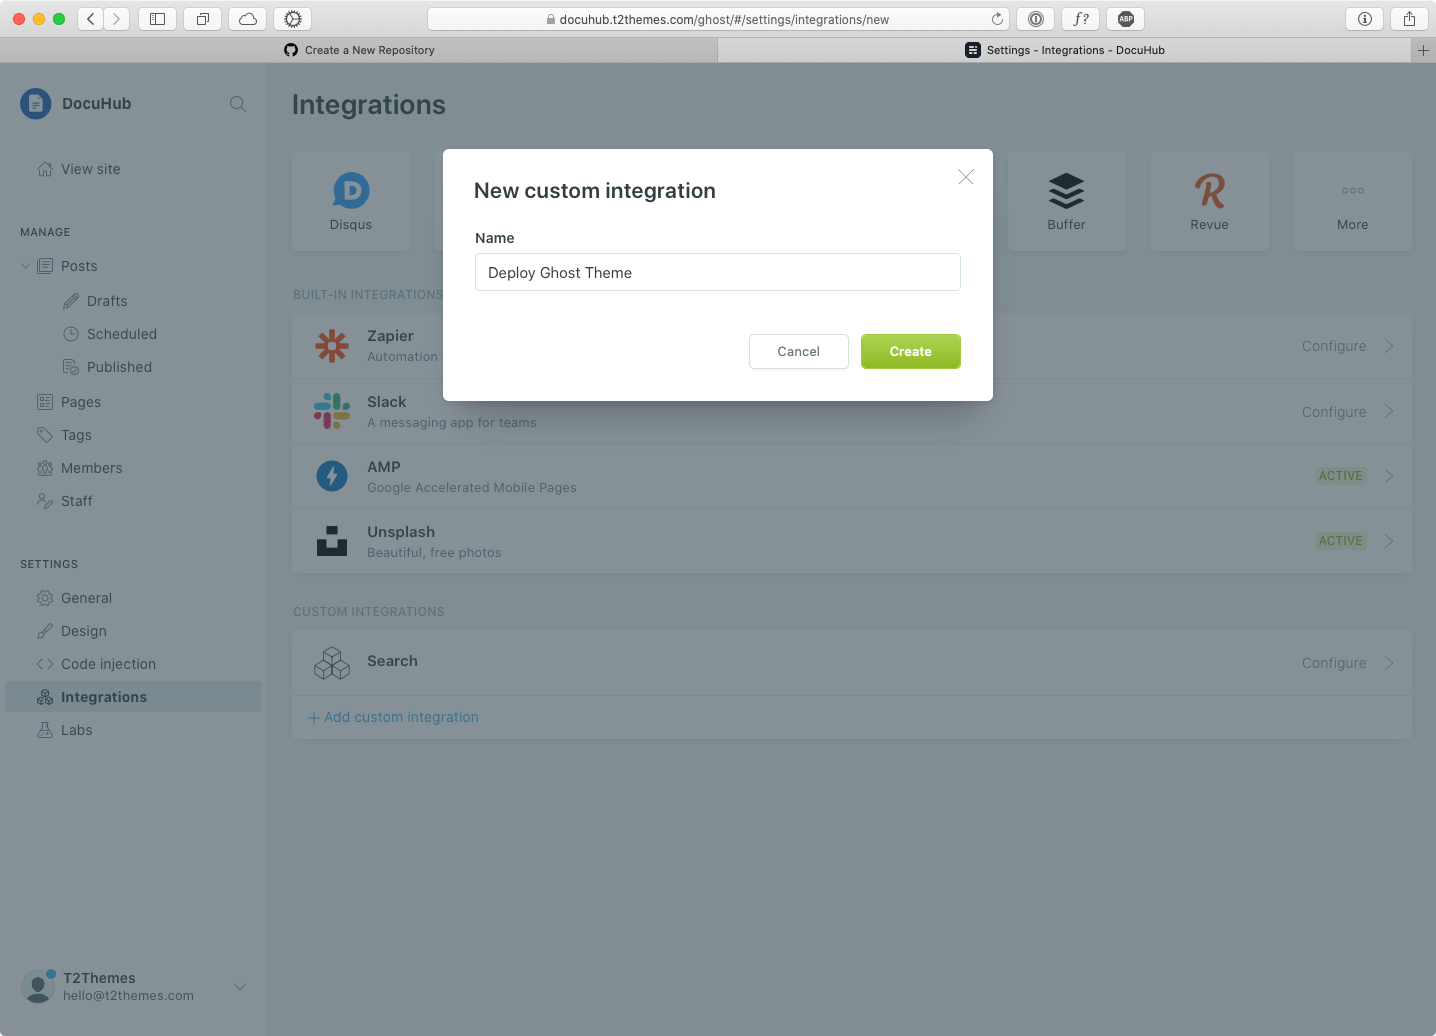
To setup automated deployments, head over to your production Ghost site and create a new Custom Integration in Ghost Admin » Integrations
You can name the new integration something like: Deploy Ghost Theme.
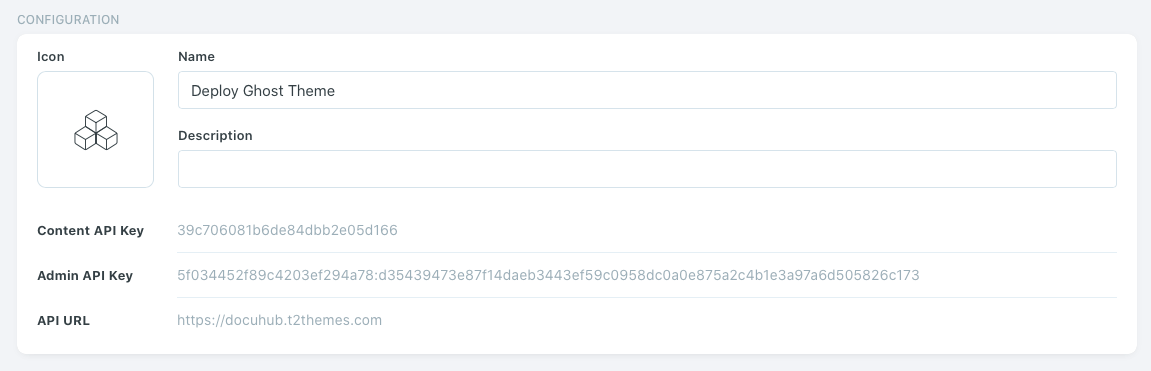
Once you’ve created the integration, make a note of these two values: Admin API Key and API URL. We’ll need them in the next step.
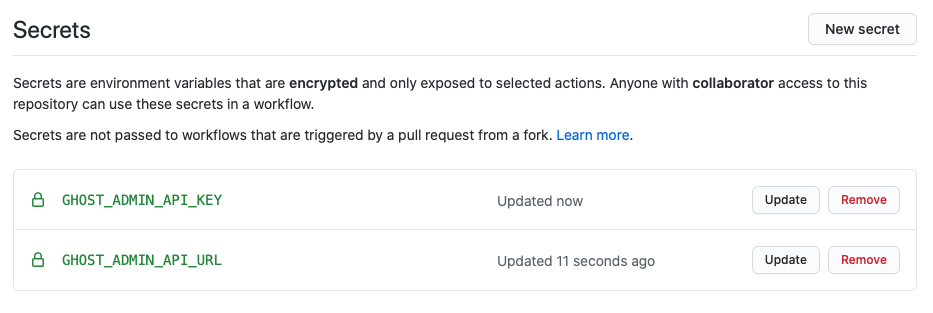
Step 4: Add GitHub Repository Secrets
Next, we’re going to head back over to your repository page on GitHub, navigate to Settings > Secrets page.
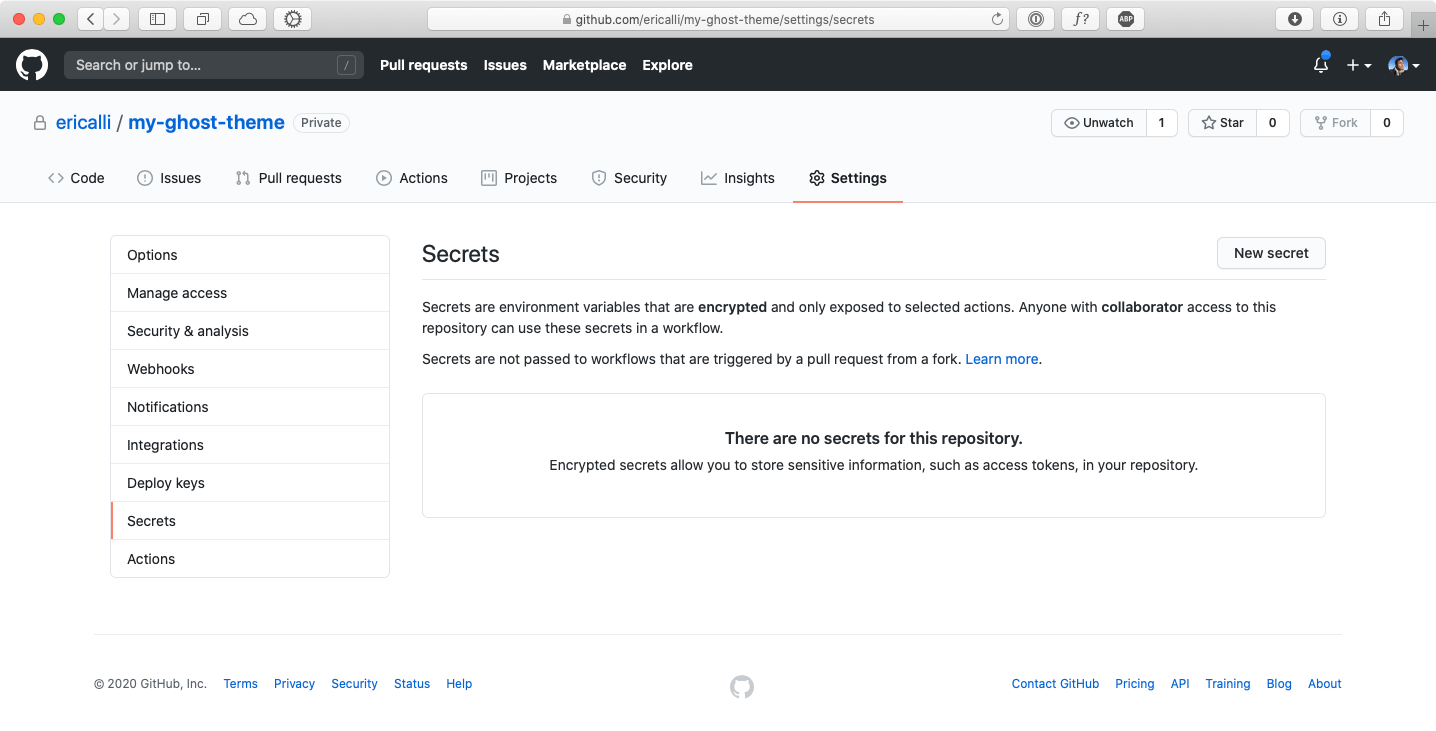
Create two new secrets. The first one called GHOST_ADMIN_API_KEY containing the Admin API Key. The second one called GHOST_ADMIN_API_URL containing the API URL.
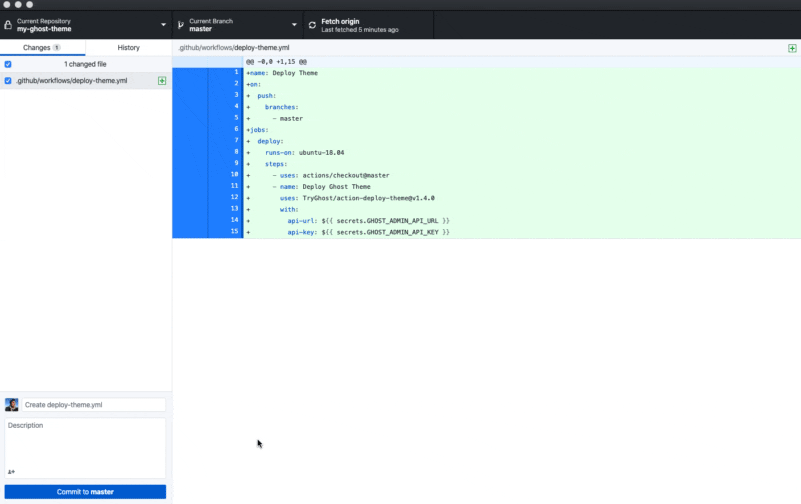
Step 5: Add GitHub Deploy Config for Ghost
Inside the theme folder on your computer, create a config file called .github/workflows/deploy-theme.yml (this is a hidden folder and may only appear in your code editor) and copy the following code into it.
name: Deploy Theme
on:
  push:
    branches:
      - main
jobs:
  deploy:
    runs-on: ubuntu-22.04
    steps:
      - uses: actions/checkout@v3
      - name: Deploy Ghost Theme
        uses: TryGhost/action-deploy-theme@v1
        with:
          api-url: ${{ secrets.GHOST_ADMIN_API_URL }}
          api-key: ${{ secrets.GHOST_ADMIN_API_KEY }}
Once you added this file, commit and push your changes to the remote repository using the GitHub app (just like in Step 2).
Now your repository is configured to trigger a deployment for every commit that is pushed to it. You have the possibility to customize the trigger to different branches, pull requests and more. To find out more, check out the official GitHub Action Documentation.
And there you have it! You can now make code changes to your Ghost theme on your local machine, push them to GitHub for safe keeping while automatically deploying the changes to your production Ghost site. Pretty nifty!
If you have and questions or if you’ve successfully setup GitHub with your Ghost theme, we’d love to hear about it! Tweet us @layeredcraft!

Eric Alli @ericalli
Eric is the founder of LayeredCraft. He has worked as a designer and engineer for 15+ years and loves creating innovative and effective themes for all industries.